Pages

Friday, November 30, 2018

Combining stamp sets: Merry Christmas Kraft card

Hello Crafty Friends!

Today is my day to post at Quietfire Creations and I am sharing a Christmas card created using two Quietfire Design stamp sets, Home for the Holidays...
Home for the Holidays Sentiments, Set of 5 - Mounted
...and Poinsettia Banner and Sentiment.
Poinsettia Banner & Sentiment, Set of 4 Stamps - Mounted
Aren't the stamp sets lovely?  Great sets for your holiday projects!

Feel free to hop on over to Quietfire Creations for card instructions and details.

Thanks for stopping by!
Have a happy, crafty day!
Big Hugs,
Kathy Jo

Thursday, November 22, 2018

It's a Gable Box-a-ganza!

Hello Crafty Friends!  Happy Thanksgiving to my friends in the U.S!

Today is a special day at Elizabeth Craft Designs and Quietfire Creations: all of the designers are sharing super fun ideas that you can do with the awesome Gable Box die designed by Suzanne Cannon for Elizabeth Craft Designs.

My submission for the Gable Box-a-ganza.  (No, it is not really called Gable Box-a-ganza...but I thought it would be cool if it was called that.  Big Smile )

Instructions:

  1. Die cut snowflake acetate using Gable Box die.  Use clear double sided adhesive tape to secure Gable box folds.
  2. Die cut silver card stock using Dotted Scallop Squares.
  3. Die cut blue metallic paper using Joy die.
  4. Tie top of Gable box using matching ribbon.
Easy!  And so pretty!
ECD product used:


Thank you for stopping by!  And don't forget to check out the other creations at Quietfire Design and Elizabeth Craft Designs.
Have a great day.
Hugs,
Kathy Jo

Tuesday, November 13, 2018

Video Tutorial: mixed media Reindeer flight

Hello Crafty Friends!

Today is my day to post at Quietfire Creations and I decided to share a video tutorial on how to make this reindeer flight mixed media card.  The card uses Quietfire Design stamps, stencil and dies in conjunction with watercolor, texture paste, metallic card stock and Nuvo Drops.  Too fun!


Here is the link to the video!  Enjoy!  :)


Thank you for stopping by!  Have a happy, crafty day!
Big Hugs,
Kathy Jo

Sunday, November 11, 2018

Being Thankful: The thankful receiver

Happy Sunday, Crafty Friends!

It is that time of year when many of us are taking time to celebrate all for which we are thankful.  An extra special way to thank a loved one or friend is to create a thank you card.  The card I am sharing today has a beautiful thankful quote that is perfect for a thank you card.  The stamp is from the A Bit of Fragrance stamp set from Elizabeth Craft Designs.


The instructions and product list can be found on the Elizabeth Craft Designs post.

Thank you for stopping by!  Have a happy, crafty day.
Big Hugs,
Kathy Jo

Saturday, November 10, 2018

Stamp Focus: Twiggy Wreath and Sentiments

Hello Crafty Friends!

It was my turn to share at Quietfire Creations and I created a card using the newly released stamp set, Twiggy Wreath and Sentiments.
Twiggy Wreath and Sentiments, Set of 5 Stamps - Mounted
The twiggy heart is so pretty!  The card created was simple to make and the steps could easily be used to make other cards.  Just mix and match your washi tape and pick coordinating ink for the heart and you have cards for almost any occasion. 

Here is a great Christmas project: create many cards as a gift for someone.  Not only does it save the happy recipient time and money for cards, they are also able to give beautiful handmade cards to their friends and loved ones.
For more card details and instructions, feel free to hop on over to the Quietfire Creations blog post.

Have a great day!
Hugs,
Kathy Jo

Monday, November 5, 2018

Create a festively fun Christmas card using newly released Crafter's Companion product

Hello Crafty Friends!

I just can't put away the newly released product from Crafter's Companion Christmas collection.  But hey, Christmas is right around the corner so that means more cards are completed.  Yay!

Today's card used different stamp and die sets.  It also used product that I seem to be addicted to: Spectrum Noir's Sparkle pens.  So yummy!

Card instructions:

  1. Create top fold card using white card stock.
  2. Mat and mount green card stock.
  3. Mat and mount Luxury Mirror card stock in red.
  4. Use black archival ink to stamp "With Love at Christmas" and Winter Wishes on white card stock.
  5. Color images using Spectrum Noir Sparkle pens.  (In the flower centers I used Spectrum Noir markers and added sparkles at the end.)  Apply Distress ink along edges.  Mount to card front.
  6. On separate white card stock: stamp, die cut and color flower, With Love at Christmas and bow. 
  7. Mount to card front using double sided adhesive tape.
  8. Optional: Apply Nuvo Crystal drops for extra sparkle on berries and bow center.
  9. Decorate inside of card as desired.


All of the product used today was recently shown on The Shopping Channel and can be purchased online here.

Are you looking for more inspiration?  Check out the Fans of Crafter's Companion on TSC Facebook page.  Every day you will see new inspiration from Crafter's Companion, the Design Teams and Crafter's Companion Fans.

Thanks for stopping by!
Have a great day.
Hugs,
Kathy Jo

Thursday, November 1, 2018

Product Focus: Crafter's Companion 3D embossing folder

Hello Crafty Friends!

Today I would like to share another card that was created for Crafter's Companion on TSC.  The card's focus is the Believe embossing folder. 

The folder was used to emboss the gold Luxury card stock.  After embossing I applied Spectrum Noir markers on the raised areas for a vintage, metallic effect.  The results are amazing.
The photo does not do it justice as it is difficult to capture the raised areas and the coloring.  Try this technique on your own and see the results.  It is very cool!

Thanks for stopping by!
Have a happy, crafty day!
Bug Hugs,
Kathy Jo

Tuesday, October 30, 2018

Bone Collector Halloween card

Hello!

Oh!  I have been waiting a month to share this card.  It was created for my hubby so I could not share it on social media until now.  He is a big fan of Halloween and the cheesy horror movies.  (Actually, he is in the other room now watching a cheesy horror film.  LOL.  He cracks me up.)

This card was a hodgepodge of different papers (Tim Holtz, Recollections, etc).  The cool dog x-ray is a stamp!  So awesome...

It seemed fitting to add Tim Holtz' "Bone Collector" tag to the front.  Hehehe.
Off to make treat bags!  Thanks for stopping by!

Have a Happy Halloween!
Big Hugs,
Kathy Jo

Crafter's Companion Vintage Candles Christmas card

Hello hello!

Is this a busy crafting time of year or what?  I love it!  There is always a perfect excuse to be in the craft room whether is is making a Halloween treat bag or a Thanksgiving card or a Christmas project.  Today's project is Christmas: a vintage looking poinsettia and candle card.  (My apologies for not supplying more photos- this was one of the cards sent for the TSC show and I only took a couple of good photos before shipping the card off.)

The card used Crafter's Companion Christmas Candles stamp and die set and Luxury Card Stock.  The candles and background papers used water color paper.  I water colored the candles and poinsettias using Distress Markers but this also could have been done with other water based inks.  For extra awesome I added Stickles to the candle flames.  :)
Really like the antiqued look of the card.  After looking at this I realize that it would be neat to try different colors for the poinsettias...hmmm...I think I see another project!

Thanks for stopping by!
Have a happy, crafty day.
Big Hugs,
Kathy Jo

Sunday, October 28, 2018

Friday, October 26, 2018

Sparkling metallic tree Christmas card


Happy Friday, Crafty Friends!

Last weekend I spent some time in the craft room to create more cards for Christmas.  Today's card used several new products from Crafter's Companion that are great to use for your holiday cards.

The focus of the card front is the metallic Christmas Tree.  It was created using the Sparkling Tree from the Create-A-Card line.  The Create-A-Card die set line is quite interesting and versatile.  The Sparkling Tree is a three piece die set with the outside cut as two dies and the internal design as one die.  The outside dies can be used together to create a single die cut tree or one of the dies can be used on the edge of card stock (as done on my card) to create a neat shaped edge.  The blue metallic tree was created using all three dies.
The end result is beautiful and adds an extra interesting feature to your card front.  I made sure to line up the paper on the inside of the card in such a way that the tree on the card front covers the tree on the inside.  A pretty little detail!

Crafter's Companion product used:
Create-A-Card, Sparkling Tree
Winter Wonderland 6x6 paper pad
Luxury card stock
Luxury mirror card stock
Festive Phrases clear stamps

Have a wonderful weekend!  Thank you for stopping by!
Have a happy, crafty day.
Big Hugs,
Kathy Jo


Wednesday, October 24, 2018

Eerie Halloween Tag Treat Box

Hello Crafty Friends!

Halloween is next week...do you want to make a treat box for the special trick or treaters on your list?  Feel free to hop on over to the Quietfire Digital blog for the info to create this sweet treat box.
Totally digging that spooky tree!

Thanks for stopping by!
Have a creepy, crafty day.
Big Hugs,
Kathy Jo

Thursday, October 18, 2018

Video Tutorial: Poinsettia Watercolor background

Hello Crafty Friends!

Today is my day to share on Quietfire Creations and I created a video tutorial for creating this festive holiday card using newly released Merry Christmas dies and the Poinsettia stamp from Quietfire.  It is a fun card to make and the tutorial is full of tips for new and experienced crafters.  Enjoy!


Is there anything that you would like to see in a paper crafting video tutorial?  Drop me a line!

Thanks for stopping by!
Hugs!
Kathy Jo

Sunday, October 14, 2018

"Find your wings" Spectrum Noir sample for The Shopping Channel

 Hello hello!

How is your crafty day going?  I hope you have some time put aside to relax and craft.  Today I am sharing a project that can be easily crafted in front of the TV or on a break at work.  (Gotta love projects like that!)  This project was created for the recently aired Crafter's Companion shown on The Shopping Channel so I went with more bold colors.  But the bird is just as beautiful in softer colors.

Instructions:

  1. Use black archival ink to stamp the "Find your Wings" bird onto Spectrum Noir Ultra Smooth card stock.  Cut image to desired size.
  2. Start coloring!  Spectrum Noir has a large selection of pencils to choose from so have fun and play!  (They also have their own Gamsol if you like blending with Gamsol.)
  3. Mount the image onto a top fold card with layers of coordinating mat papers.  For this card I used the yummy Crafter's Companion card stock.
  4. Add a bow and some bling to the corner and you have a beautiful card completed!

Below is another closeup of the bird...it is so pretty!
Thank you for stopping by!
Have a wonderful day!
Big Hugs,
Kathy Jo

Saturday, October 13, 2018

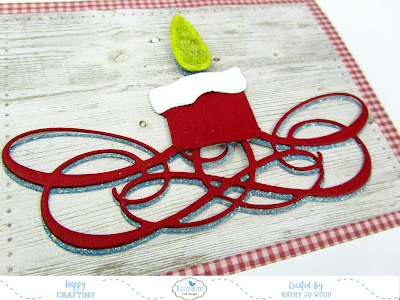
"Rejoice" Festive candle card

Hello Crafty Friends!

Today is my day to post at Elizabeth Craft Designs' blog and I created a festive Rejoice card using newly released dies.

Such a pretty candle with the elegant swirls as the base!

For card details and instruction, please feel free to hop on over to the blog post.

Thanks for stopping by!  Have a happy, crafty day.
Big Hugs,
Kathy Jo

Tuesday, October 9, 2018

"Something wicked this way comes"


Hello Crafty Friends!

It is my turn to post at Quietfire Creations and I am sharing a totally wicked (pun intended) card using the newly released Something Wicked 2018 stamp set:
Something Wicked 2018, Set of 6 Stamps - Mounted
It is a very cool stamp set that can be used on your Halloween projects from treat bags to cards to scrapbook pages.

For more info on the card, feel free to hop on over to the blog post.

Thanks for stopping by!  Have a happy, crafty day.
Hugs,
Kathy Jo

Thursday, October 4, 2018

Mini Christmas Treat Boxes...and a GIVEAWAY!!

Hello Crafty Friends!

Some fun news to share: to celebrate the new Mini Flourished Christmas dies release, Quietfire Design is having a giveaway!  You can win one of newly released die sets...Woo-Who!!  All you have to do is leave a comment on the blog.  I am sharing my projects on the blog today so feel free to leave some love on that post for your chance to win!  Improve your chances by leaving comments on the other posts this week.  The link to the blog post is HERE.

The boxes created were too fun to make!  More photos and details are on the post.  :)
Thanks for stopping by!
Good luck on the draw!
Big Hugs,
Kathy Jo

Friday, September 28, 2018

Exciting news! Projects on The Shopping Channel October 2!

Hello Crafty Friends!

I am out of the world happy to say that Crafter's Companion will be showcased on The Shopping Channel October 2...and I created 23 samples for the show!!!  That's right, this crafty gal will have projects on TV!  Can you believe it?  It still seems like a dream!

Here is one of the samples I created for the show.  It used several of the product from the Winter Wonderland Collection: Winter Wonderland papers, Dendritic Crystals background die, Matt Mirror card stock and the Festive Wishes die/stamp set.  Let's dive into the instructions!

Card instructions:

  1. Create top fold card using white card stock.
  2. Cut Luxury Mirror card stock to size and mount to card front using double sided adhesive tape.
  3. Mat and mount ornaments patterned paper (from 12 x 12 Winter Wonderland paper pad).
  4. Die cut Dentritic Crystals background die using Matt Mirror card stock.  Mount onto white card stock using liquid adhesive. Mount to card front.
  5. Fussy cut poinsettias and layer onto card front.  Apply Nuvo drops to flower center.
  6. Die cut matt and mirror card stock using Festive Wishes dies.  Mount to card front using double sided foam adhesive.
  7. Create bow and mount using liquid adhesive.  Fussy cut poinsettia and add to bow center.
  8. Decorate inside of card as desired.
Hope you enjoyed the project!  And I hope you will be able to check out the show on October 2!

Big Crafty Hugs!
Kathy Jo

Saturday, September 15, 2018

"Let your dreams soar" inspirational butterfly card

Hello Crafty Friends!

Today on Elizabeth Craft Designs I am sharing a pretty-in-pink inspirational butterfly card using beautiful dies and stamps designed by Suzanne Cannon for her A Way With Words collection.
If you would like to see the list of product used and the instructions, feel free to hop on over to the blog post.  :)

Have a happy, crafty day!
Big Hugs,
Kathy Jo

Monday, September 10, 2018

New Release! Autumn smile and grid background


Happy Monday!

Today is my day to share at Quietfire and I created a project using two newly released stamps from Quietfire Design:

The Autumn Collection stamp set is just beautiful.

Autumn Collection, Set of 4 Stamps - Mounted

Totally digging the new Grid Background as it can be used on many different types of projects. 

Grid Background - Mounted

For more card details and instructions, please feel free to hop on over to the Quietfire blog post. 

Thanks for stopping by!
Big Hugs,
Kathy Jo

Tuesday, August 28, 2018

"Always believe" 15 minute elegant and inspirational card

Hello Crafty Friends!

Today is my day to share at Quietfire Creations and I created a quick, easy and elegant card using the beautiful Always believe stamp:
Always Believe - Mounted
The card comes together in a flash yet the results are gorgeous.  Feel free to hop on over to Quietfire Creations for more details and instructions.

Thanks for stopping by!  Have a happy, crafty day.
Big hugs,
Kathy Jo

Saturday, August 25, 2018

"Shoot for the moon" mixed media card


Hello Crafty Friends!

How is your day going?  Do you plan on getting some crafty time in or are you looking for some crafty inspiration?  Hopefully the card I created for Elizabeth Craft Designs will provide some inspiration.  :)

The card used two Elizabeth Craft Designs products: the Soar stamp set
...and the Flourished Night Sky die set:

For more card details and instructions, feel free to hop on over to the Elizabeth Craft Designs blog post.

Thank you for stopping by!  Have a happy, crafty day!
Big Hugs,
Kathy Jo

Thursday, August 23, 2018

"A bit of fragrance..." thank you card

Hello Crafty Friends!

Today I am sharing an elegant layered thank you card using stamps designed by Suzanne Cannon for Elizabeth Craft Designs.  The lovely quote is showcased on layers of ivory and gold die cuts.  The quote is from the stamp set, A bit of Fragrance:
It is a stamp set full of beautiful quotes and images!

This card was shared on the Quietfire Creations blog.  Feel free to hop on over for more details.  :)

Product used:
A bit of fragrance stamp set, Elizabeth Craft Designs
Iron Romance die set, Spellbinders
Iron Elegante die set, Spellbinders
Large Labels die set, Spellbinders
Ivory and gold card stock
Unknown patterned paper

Thanks for stopping by!
Have a happy, crafty day!
Big Hugs,
Kathy Jo

Tuesday, August 7, 2018

Happy Birthday florals

Hello Crafty Friends!

How is your August going?  Have you been enjoying your summer weather?  My flowers are enjoying the August sun.  In the past few days the lilies have started to bloom and they smell fabulous.  The Bee Balm are attracting humming birds and other busy fliers.  The Coneflowers are gleefully open and the Black Eyed Susans are starting to show their sunny petals.  The garden may have some weeds but even they are in bloom.  It is a beautiful scene.

The garden flowers inspired the birthday card I am sharing today.  Let's jump into the instructions:

  1. Create a top fold card from blue card stock.  Mat and mount floral paper (Bo Bunny Genevieve) to the card front.
  2. Die cut white card stock using Swirl Lattice die.  Cut blue patterned paper to size and apply gold marker along edge.  Adhere lattice die cut.  Mount to card front using double sided foam tape.
  3. Die cut patterned paper using Rose Buds die.  Form flowers and add stamens to center.  
  4. Mount flowers and gem swirl to lattice die cut.
  5. Die cut vellum paper using Spellbinders Opulent Ovals die.  Cut Happy Birthday twice- once in gold and once in white card stock.  Offset mount to vellum oval.  Mount to card front.
  6. Decorate inside as desired.
 

Thank you for stopping by! 
Have a happy, crafty day.
Big Hugs,
Kathy Jo
Related Posts Plugin for WordPress, Blogger...